Wednesday, September 22, 2010

Front Yard coming soon!!

Tyler built me a front yard!! Hopefully next summer the kids will be enjoying this little play area outside! He built the retaining wall and filled in the area with top soil. Then we seeded!
The grass is coming in now!!


Oh and the county took down that huge dead tree that was on the side of our house! It use to be to the left of the 2 trees in the above picture.

Wednesday, June 30, 2010

Rain Gutter Bookshelves...

Tyler put up some rain gutter bookshelves in the kids play room....(yes those are rain gutters that you find at the home improvement store!)


Here is where I first saw these....she has a tutorial!

Tuesday, June 22, 2010

Front Porch Railing....Finally done!


A year ago we bought our home....You can see the before at the top of my blog....We are still working on the other parts of the front yard...Lots more to be done!


The deck railing didn't take too long, but the weather kinda lengthened the process of touch up painting. It turned out so well. Tyler simply amazes me with his talents. I tell him I want a railing out front and this is what he creates....without drawing it out or anything....I am the opposite I have to write everything down and think about it forever before I even begin. But when I told him what I wanted he created it even better then I had imagined it!!
Tyler built the pole that is out in front and I painted it to match the other poles on the deck. He built every part of the railing. It took lots of cutting, painting, screws and nails. We have been busy. He also made the hand railing along the side so it is easier to get up the stairs now. I absolutely love it!

Wednesday, June 2, 2010

Headboard (how to added, see bottom)

Before.... So we decided our room needed a little makeover. We got new bedding and new end tables, we also etched the small glass windows above the bed. Last week I painted the whole room and this week we made a headboard...here are the results!!

After....

I know...It's awesome!!


Here is a link to where I saw the headboard.....brassy apple headboard

How we did it....We used a piece of plywood and cut to width of our bed (ours is a Cal King). Bought the fabric (fake leather stuff) from JoAnns in the home decorating fabric section, half off of course. Also bought the batting (we did not use foam just 2 layers of the thickest batting) with a coupon. The fabric cover buttons can also be found at JoAnn's but our fabric was too big to actually push in the button so I just sewed the fabric and tightened it around the button (first I added our tough, thick string to the button) that is the part you will put through the hole in the board and staple to the back. You can also just buy buttons that match your material. Here are the step by step instructions...


1. Cut plywood to size and drill holes where you want your buttons.


2. Cover wood with 2 layers of batting (or foam and then batting) and staple.


3. Cover batting with Fabric, pull tight and staple all the way around.


4. From the back you can locate the holes you drilled for the buttons, just push a nail through to the front, you can make a big needle by twisting up a piece of wire to pull the string on your button through the hole (see pic)


5. Pull button string through and staple well to back of board (we then hammered down the staples to make sure they were tight)


6. Finally drill 2x4's or we used 1x2's to the back of the board (the height you want the board to stand behind your bed. (see pic) Then just prop it up behind your bed:)


Wednesday, May 12, 2010

You can see the true before above in my blog title. Well the plants that the house came with were pretty random so we went to work trying to make the front look better. First we spent a couple days digging this area out and then Tyler built the awesome lattice for under the deck! I helped by painting it and helping put it together. Here it is all put in...


And then the planting began...Ty put the Rhododendrons in before we went to Vegas and when we got back we bought the rest of our plants and put them in. Then we put down weed barrier and bark...looks so much better!

And the kids just loved playing outside so much and playing in the dirt. The hanging baskets were from Ty for Mother's day.

Next on the to do list is....The other parts of the front yard and putting in a deck railing on the porch.
Posted by Picasa

Thursday, February 4, 2010

Peg Board Storage in Garage

So we needed more shelf space so we decided to put up some peg board in the Garage to hang some larger items on the wall to help get organized. Tyler decided he wanted to go all the way to the ceiling...

Here's a peak of what it looks like mostly filled up...

P.S. If you are interested in putting these up keep in mind spacers can get spendy...we decided to make our own by buying a long plastic tubing marking it at the thickness we wanted and cutting with the saw. Very easy and a lot cheaper!

I loved this peg board so much for organizing that I decided to buy a smaller piece, paint it with some extra paint from Sam's room to use it in my craft room....Here is a sneak peak....I will update once we hang it:)
Posted by Picasa

Frosted windows...

So we have these little miniature windows above our bed in our bedroom. We weren't sure how to cover them, curtains someday but for now we thought the best thing to do would be to frost them with that frosting spray (not like the Christmas frost) it is more like etching but less permanent. You could scrape it off with some goo-be-gone. Here is the before...

And After...

Before up close...

After...
Posted by Picasa

Kiddie Table Redo

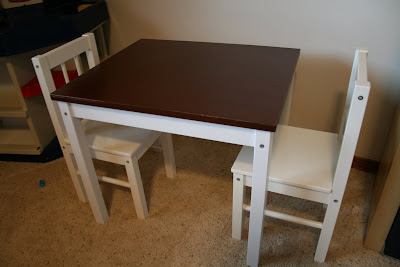
So we bought this table with 2 chairs at ikea...Unfinished with lots of coloring on it and stains...

So I decided to redo it...and this is what I came up with...

I sanded the top then stained it with leftover stain from the shelves, then painted the legs white. Lots of top finishing coats to keep it from wearing on top. I love how it turned out. I am planning on making little seat cushions for the chairs to add some color should be cute.

Posted by Picasa

Toy Room Bins

Toy Bins Finally!! So we bought this big storage unit last year at ikea. Had to wait to buy the bins once they came in, long time!! Then we filled them with different toys. I thought of labeling each so the kids could put their own toys away. So this is what I came up with. I took picts of all their toys (their actual toys that are in the bins) added text and printed them on transfer paper. Ironed onto white fabric and fused that to the bins! Love it!!


Posted by Picasa

The New Couch...

We really wanted a sectional for the family room. We found this beauty at a scratch and dent store. It comes apart in lots of places so we can arrange it however we want. This is what we came up with. Note: Those are the shelves in the background that we have been working on for months now...still need to stain the trim and put it up. We also plan on eventually refinishing the roll top desk!

Posted by Picasa